Tutorial 1: Creating an Ad Hoc Report on one Database Table
Learn to create a simple ad hoc report and data service configuration against one database table in Pull Reports™.
This tutorial introduces Pull Reports™ catalog configuration by creating a single report against one database table. You will learn important concepts such as what a report base table is and an introduction to table and column resource paths. Additionally, this tutorial provides example configuration in both XML and Java.
Since Pull Reports™ catalog configuration references relational database tables, the following tutorial
will use a fictional database called class_info which models data about
an Elementary School. We will start the example report with just a single table but expand
the report to include more tables through relational joins
in the next tutorial.
Note
This tutorial assumes you have a working Pull Reports™ installation and are ready to create your first Pull Report. If you still need to install Pull Reports™, see the Installation Guide.
Additionally, since the class_info database is just explanatory
and not actually present in your Pull Reports™ installation environment, the steps in the
tutorial will not work with your Pull Reports™ installation. However, the concepts
within the tutorial are directly applicable to your Pull Reports™ catalog configuration.
The Base Table
To begin, imagine the class_info database contains one table called
student which contains information about students enrolled in an Elementary School.
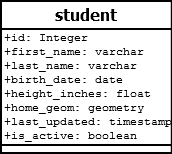
This UML class represents the student table:
The student table will be the single, base <table>
of our first report. A Pull Report base table is special. At least one column from the base table is always
included in the Export Report REST API export result, and all SQL joins to other,
<relationship> tables originate from the base table.
In this way, the base table represents the core view into the report data model.
At this point in the tutorial, the student table is the only table in the
class_info database, so it is the only base table candidate. In more
complex databases with multiple, related tables, you may create multiple reports with differing base
tables to represent different report views.
Note
See Tutorial 4 for information about creating multiple reports in the same Pull Reports™ installation.
The columns of the student table are largely self-explanatory except for the
home_geom column. This column contains the geographic point location (e.g. latitude / longitude)
of the student's home address. This point geometry will be used in
Tutorial 4
when we learn about exporting results to the kml,
geojson, and map GIS export formats.
Choosing a Configuration Technology
Every Pull Report configuration is contained within one catalog configuration. A catalog groups one to many reports into a common resource path within the Pull Reports REST API and allows multiple reports to share common security, JDBC DataSource, or logging configuration.
A catalog may be defined as a Pull Reports™ XML Catalog file or as a Java class implementing the
CatalogConfigurationFactory Catalog Configuration API interface.
For simple Pull Reports™ installations, configuration via XML is typically sufficient.
However, if you need to dynamically create configuration from an external source
such as a database, would like to reuse configuration between Pull Reports™ installations,
or you prefer programmatic, Java configuration over declarative, XML configuration,
use the Java API.
In this tutorial, we show example configuration in both techniques.
Your First XML Catalog File
Pull Reports™ XML Catalog files must conform to an XSD schema file found at https://www.pullreports.com/docs/xsd/pullreports-catalog-1.5.0.xsd
and in the dist directory of the
software media.
Use the XSD to validate the XML structure.
Additionally, the Pull Reports™ XML Catalog file schema documentation
provides detailed help on each XML element. To browse the documentation,
start with the root <catalog> element.
class-report-catalog.xml
To create your first catalog and report, create a text file
named class-report-catalog.xml within the Java classpath
of the Pull Reports™ installation WAR. A typical location for the file
is the WAR's WEB-INF/classes directory.
Secondly, reference the class-report-catalog.xml file within the
catalogs
installation property like so.
catalogs=classpath:class-report-catalog.xml
There are several other ways to store and reference Pull Reports™ XML Catalog files. See the the section called “Catalog Configuration” within the Installation Guide for more information.
Now that you have created the class-report-catalog.xml text file, paste the following
into the file:
<?xml version="1.0" encoding="UTF-8"?>
<catalog xmlns="http://www.pullreports.com/catalog-1.7.0" id="class" name="Class Reports"
    xmlns:xsi="http://www.w3.org/2001/XMLSchema-instance"
    xsi:schemaLocation="http://www.pullreports.com/catalog-1.7.0
    https://www.pullreports.com/docs/xsd/pullreports-catalog-1.7.0.xsd">
    <report id="student-information" name="Student Information">
        <export_config defaultColumns="firstn,lastn"/>
        <table id="student" name="class_info.student" displayName="Student">
            <column id="id" name="id" displayName="Student ID" paramType="java.lang.Integer" export="false"/>
            <column id="firstn" name="first_name" displayName="First Name"/>
            <column id="lastn" name="last_name" displayName="Last Name"/>
            <column id="height_in" name="height_inches" displayName="Height (in)" paramType="java.lang.Double"/>
            <column id="bdate" name="birth_date" displayName="Birth Date" paramType="java.sql.Date"/>
            <column id="active" name="is_active" displayName="Active?"
                paramType="java.lang.Boolean" export="false"/>
            <pre_filter>@active=true</pre_filter>
        </table>
    </report>
</catalog>
<catalog> Explained
The root element of every Pull Reports™ XML Catalog file is <catalog>. In this example:
<catalog xmlns="http://www.pullreports.com/catalog-1.7.0" id="class" name="Class Reports"
    xmlns:xsi="http://www.w3.org/2001/XMLSchema-instance"
    xsi:schemaLocation="http://www.pullreports.com/catalog-1.7.0
    https://www.pullreports.com/docs/xsd/pullreports-catalog-1.7.0.xsd">
A <catalog> groups one to many <report>s
under a common URL path within the Pull Reports REST API identified by the <catalog> id attribute.
Although a <catalog> may contain many <report>s, a single XML Catalog file
may contain only one <catalog>.
However, it is possible to split a <catalog>
with the same id across many XML Catalog files;.
XML Namespace and Schema Validation:
The xmlns="http://www.pullreports.com/catalog-1.7.0" defines the default XML namespace. This
namespace maps to the pullreports-catalog-1.7.0.xsd found at https://www.pullreports.com/docs/xsd/pullreports-catalog-1.5.0.xsd and in the
dist directory of the
software media.
The pullreports-catalog-1.7.0.xsd file may be used to
validate the XML document.
<report> Explained
Each <report> in a <catalog> defines report web services available within the
Pull Reports REST API. The configured catalog and report id attributes compose a unique URL to each service.
The most important web service is the Export Report REST API because this is the endpoint that exports report results from the underlying database. In this first report, the Export Report REST API is available at the following URL. The configured catalog and report id's within the URL are emphasized.
/[context]/pullreports/catalog/class/report/student-information/export
<table> Explained
The <table> element which is a direct child to a <report> is the
base table of the report. In our example, the base table uses the name
attribute to define the underlying database table, class_info.student.
<table id="student" name="class_info.student" displayName="Student">
While it is common to define <table>s with a name, Pull Reports™ also
supports dynamic table definition via the <subquery> element.
The table id attribute is important because it defines the
table within table resource paths. Table resource paths identify the table
within REST API HTTP parameters and other catalog configuration. In this example, the
table resource path to the base table is /student
<column> Explained
Every <table> must have at least one child <column> or <column_group_ref>.
However, it is not required to declare <column> elements for every actual column of a
database table. For instance, this example does not
declare a <column> for the last_updated
nor home_geom columns.
<column id="id" name="id" displayName="Student ID" paramType="java.lang.Integer" export="false"/>
<column id="firstn" name="first_name" displayName="First Name"/>
<column id="lastn" name="last_name" displayName="Last Name"/>
<column id="height_in" name="height_inches" displayName="Height (in)" paramType="java.lang.Double"/>
<column id="bdate" name="birth_date" displayName="Birth Date" paramType="java.sql.Date"/>
<column id="active" name="is_active" displayName="Active?"
    paramType="java.lang.Boolean" export="false"/>
Similar to <table> id attributes, <column> id attributes are
important because they identify the column within column resource paths. Column resource paths are used
within Pull Reports REST API HTTP parameters and other catalog configuration. In this example, the
column resource path to the first_name column is /student@firstn.
You may wonder why some columns specify the paramType
attribute while the other columns do not. The paramType
attribute is necessary to identify the column's data type in the underlying
database. The default value is java.lang.String and is only appropriate for
character data types. Non-character columns must have appropriate
paramType attribute values to avoid type conversion errors when creating
filters on the column.
Additionally, the id and active columns are defined with
export="false".
This excludes the student.id and student.is_active values from
Export Report REST API export results but retains the column's use
for filtering or as a template value
(see <url_template> and <placemark_name_template>).
Read more about <column> attribution in the
schema reference.
<export_config> Explained
The optional <export_config> element configures capabilities of the Export Report REST API.
In this example, the defaultColumns attribute
is a comma separated list of one or more <column> ids from the
report's base table. The Export Report REST API will include these columns
in the export result if no other columns are specified
within the columns parameter.
It is customary to set default column(s) which uniquely identify each base table
row.
<pre_filter> Explained
The optional <pre_filter> element applies a filter condition to all Export Report REST API results.
A <pre_filter> is a convenient way to exclude records which should never be exported.
In this example, the <pre_filter> restricts export results to records in which the
is_active columns is true.
<pre_filter>@active=true</pre_filter>
Note
For more complex filter requirements such as restricting the export results
based on user access controls, see the <subquery> element.
Your First CatalogConfigurationFactory
So far in this tutorial we have used Pull Reports™ XML catalog configuration.
Pull Reports™ also provides a Catalog Configuration Java API.
Objects in the Java API are named and attributed similarly to the analogous XML elements. For instance,
a <report> in the XML configuration is analogous to
a ReportConfiguration.Builder in the Java API.
To begin using the Catalog Configuration Java API, implement the
CatalogConfigurationFactory interface and return an instance of
CatalogConfiguration from the makeCatalog method.
The returned CatalogConfiguration class contains the same Pull Reports™ configuration
capability as does one Pull Reports™ XML Catalog file.
In order to be found on application start up, register the CatalogConfigurationFactory
implementation within the catalogs
installation property like so:
catalogs=factory:com.pullreports.examples.tutorial.StudentTutorial1CatalogConfigurationFactory
The following CatalogConfigurationFactory returns the same configuration
as does the class-report-catalog.xml file.
package com.pullreports.examples.tutorial;

import com.pullreports.export.request.FilterValue;
import com.pullreports.export.request.Operator;
import com.pullreports.model.CatalogId;
import com.pullreports.model.ColumnId;
import com.pullreports.model.ParamType;
import com.pullreports.model.ReportId;
import com.pullreports.model.TableId;
import com.pullreports.model.config.CatalogConfiguration;
import com.pullreports.model.config.CatalogConfigurationFactory;
import com.pullreports.model.config.ColumnConfiguration;
import com.pullreports.model.config.PreFilter;
import com.pullreports.model.config.ReportConfiguration;
import com.pullreports.model.config.TableConfiguration;
import com.pullreports.model.exportconfig.ExportConfiguration;

import jakarta.servlet.ServletContext;
import java.util.Arrays;
import java.util.Collections;
import java.util.List;

public class StudentTutorial1CatalogConfigurationFactory implements CatalogConfigurationFactory {

    @Override
    public CatalogConfiguration makeCatalog(ServletContext servletContext) {

        ColumnConfiguration idColumnConfiguration = new ColumnConfiguration.Builder(
            new ColumnId("id"),"id").setDisplayName("Student ID")
            .setParamType(ParamType.INTEGER).setExport(false).build();

        ColumnConfiguration firstnColumnConfiguration = new ColumnConfiguration.Builder(
            new ColumnId("firstn"),"first_name").setDisplayName("First Name").build();

        ColumnConfiguration lastnColumnConfiguration = new ColumnConfiguration.Builder(
            new ColumnId("lastn"),"last_name").setDisplayName("Last Name").build();

        ColumnConfiguration heightInColumnConfiguration = new ColumnConfiguration.Builder(
            new ColumnId("height_in"),"height_inches").setParamType(ParamType.DOUBLE)
            .setDisplayName("Height (in)").build();

        ColumnConfiguration bdateColumnConfiguration = new ColumnConfiguration.Builder(
            new ColumnId("bdate"),"birth_date").setParamType(ParamType.DATE)
            .setDisplayName("Birth Date").build();

        ColumnConfiguration activeColumnConfiguration = new ColumnConfiguration.Builder(
            new ColumnId("active"),"active").setDisplayName("Active?")
            .setParamType(ParamType.BOOLEAN).setExport(false).build();

        List<ColumnConfiguration> columnConfigurations = Arrays.asList(
                idColumnConfiguration,firstnColumnConfiguration,lastnColumnConfiguration
                ,heightInColumnConfiguration,activeColumnConfiguration
                ,bdateColumnConfiguration);

        PreFilter activePreFilter = new PreFilter(activeColumnConfiguration.getId()
            ,Operator.EQUALS, FilterValue.asList(Boolean.TRUE));

        TableConfiguration studentTableConfiguration = new TableConfiguration.Builder(
            new TableId("student"),"Student",columnConfigurations)
            .setName("class_info.student")
            .setPreFilters(Collections.singletonList(activePreFilter)).build();

        ReportConfiguration studentReportConfiguration = new ReportConfiguration.Builder(
            new ReportId("student-information"),"Student Information",studentTableConfiguration)
            .setExportConfiguration(
                new ExportConfiguration.Builder().setDefaultColumns(Arrays.asList(
                    firstnColumnConfiguration.getId(),lastnColumnConfiguration.getId()))
                .build()).build();

        List<ReportConfiguration> reportConfigurations = Collections.singletonList(studentReportConfiguration);

        return new CatalogConfiguration(new CatalogId("class"),"Class Reports",reportConfigurations);
    }
}
This concludes Tutorial 1 in which we learned the basics of Pull Reports™ catalog configuration.
Continue to Tutorial 2 to extend
the report data model via <relationship> configuration.